Develop a JupyterLab Winter Theme
JupyterLab 3.0 is about to be released and provides many improvements to the extension system. Theming is a way to extend JupyterLab and benefits from those improvements.
While theming is often disregarded as a purely cosmetic endeavour, it can greatly improve software. Theming can be great help for accessibility, and the Jupyter team pays attention to making the default appearance accessibility-aware by using sufficient contrast. For users with a high visual acuity you may also choose to increase the information density.
Theming can also be a great way to improve communication by increasing or decreasing emphasis of the user interface, which can be of use for teaching or presenting. Theming may also help with security, for example, by having a clear distinction between staging and production.
Finally Theming can be a great way to express oneself, for example, by using a branded version of software that fits well into a context, or expressing one's artistic preferences or opinions.
In the following blog post, we will show you step-by-step how you can develop a custom theme for JupyterLab, distribute it, and take the example of the jupyterlab-theme-winter theme we release today to celebrate the end of 2020.
JupyterLab and Themes
JupyterLab customisation can be done via what are called Extensions. All
behaviors and user interface elements of JupyterLab can be changed by providing
extensions; this is true for elements that are added to JupyterLab, but also for
the core components. A Theme is one of those extensions. The default light and dark
themes are always good examples to look at if you want to understand how to build
a theme.
Generally all information about how extensions work in JupyterLab is applicable to a theme, though there are a number of optional steps and behaviors that are not necessary for themes, and a few configurations that are needed for themes. A lot of boilerplate can also be extracted, which makes creating most themes simpler that full-fledged extensions.
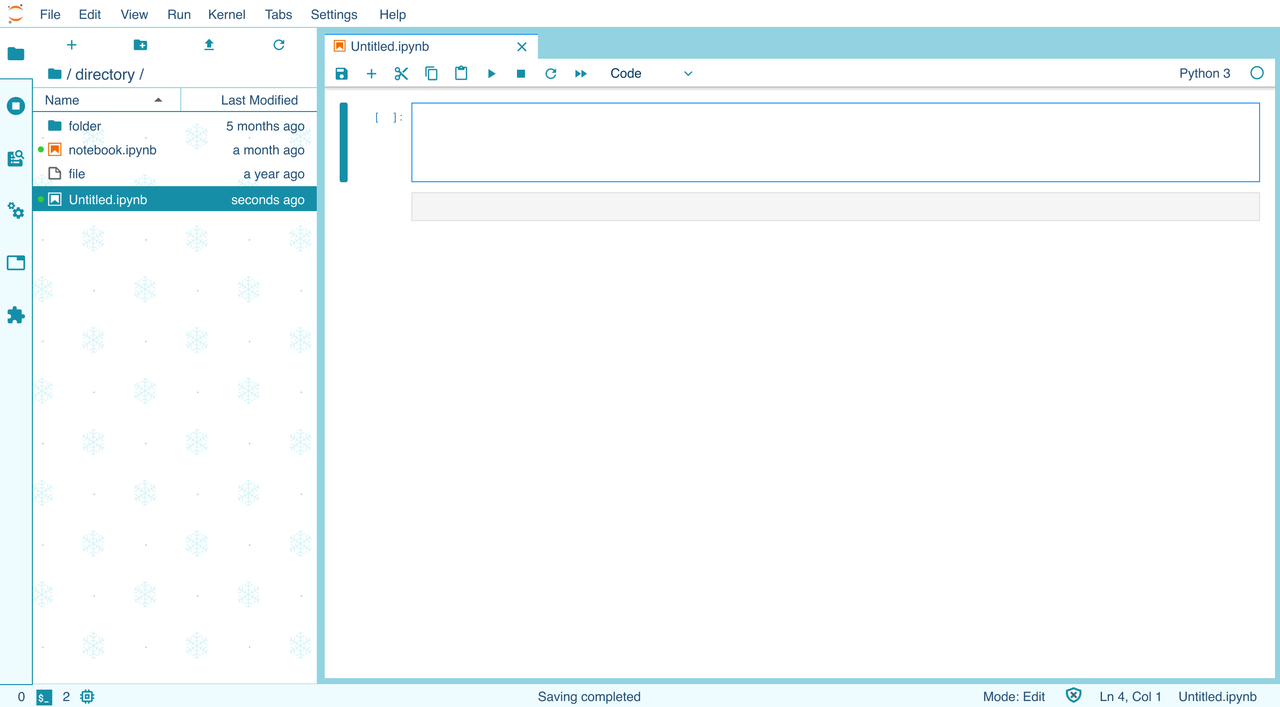
Let's first see what we are trying to accomplish in a screenshot of the "winter 2020" theme. You will have the option to choose this theme in the dropdown menu of JupyterLab:
To do so we'll need to:
- Install JupyterLab
- Create a new theme extension
- Install this extension
- Switch to our new theme
- Progressively change the appearance of our JupyterLab components until we get the desired outcome
Optionally, once you are happy with the result, or would like to get feedback from the
community, you can publish the theme so that people can complain suggest improvements
and contribute.
Installing JupyterLab
To get started you do not need a development version of JupyterLab. This can be achieved with:
$ pip install --pre jupyterlab==3.0rc14 jupyter_packaging cookiecutter
While we are at it we will need to install nodejs. Because nodejs is not a Python package you will need to use conda or another package manager.
$ conda install nodejs
Creating a Theme Extension
Now the hard part: you have an idea, you need a name. Naming is one of the hardest things in development, along with caching results and off-by-one errors, but it is critical to adoption and discoverability.
Now that you have your perfect name, create your project. We suggest using
the JupyterLab cookiecutter to create the initial boilerplate, and, as a
prerequisite, install the jupyter_packaging library needed to develop extensions.
We won't actually create the boilerplate until farther below in this post.
$ pip install jupyter_packaging cookiecutter
Normally we would use theme-cookiecutter but it is not yet updated for JupyterLab 3, so we fall back to the more generic extension-cookiecutter-ts and will highlight the specifics of a Theme extension compared to a standard one.
Run cookiecutter and provide some information about your extension:
$ cookiecutter https://github.com/jupyterlab/extension-cookiecutter-ts --checkout 3.0
author_name []: My Name
python_name [myextension]: jupyterlab-theme-winter
labextension_name [myextension]: @my-repo/jupyterlab-theme-winter
project_short_description [A JupyterLab theme extension.]: A winter theme for jupyterlab
has_server_extension [n]:
has_binder [n]:
repository [https://github.com/my_name/myextension]:
This has created the extension jupyterlab-theme-winter. We can go to the directory and
immediately turn it into a git repository.
$ cd jupyterlab-theme-winter
$ git init
$ git add .
$ git commit -am 'initial commit'
Building and Installing the Extension
JupyterLab 3 has focused on make extension authors' lives easier, and it has done a great job of it. As a developer, you just need to run a single command to be up and running with your extension. You only need to do this once.
jupyter labextension develop --overwrite
We are now ready for the development session. As we want to iterate fast, we will launch a watch process that continuously compiles your extension on each of your changes and will make it available in the JupyterLab frontend so that you can see the changes immediately.
jlpm watch
Remember, we have not yet created our boilerplate from the theme cookiecutter, so we need to make sure we turn the code into a theme extension with the following two actions.
First, replace the content of src/index.ts with the following content
import {
  JupyterFrontEnd,
  JupyterFrontEndPlugin
} from '@jupyterlab/application';

import { IThemeManager } from '@jupyterlab/apputils';

/**
 * Initialization data for the @quansight-labs/jupyterlab-theme-winter extension.
 */
const extension: JupyterFrontEndPlugin<void> = {
  id: '@quansight-labs/jupyterlab-theme-winter',
  requires: [IThemeManager],
  autoStart: true,
  activate: (app: JupyterFrontEnd, manager: IThemeManager) => {
    console.log('JupyterLab extension @quansight-labs/jupyterlab-theme-winter is activated!');
    const style = '@quansight-labs/jupyterlab-theme-winter/index.css';
    manager.register({
      name: 'JupyterLab Winter',
      isLight: true,
      load: () => manager.loadCSS(style),
      unload: () => Promise.resolve(undefined)
    });
  }
};

export default extension;
Then in the package.json, add "jupyterlab-theme" to the list of keywords and ensure that the jupyterlab stanza looks like this.
  "jupyterlab": {
    "extension": true,
    "themePath": "style/index.css",
    "outputDir": "jupyterlab_theme_winter/labextension"
  }
In a separate terminal you can now start JupyterLab in watch mode.
jupyter lab --watch
Now you will see the theme available from the Settings menu.
You can switch themes; but as you will see; the current theme is identical to
the light-theme. Now it's time to modify some values in the styles/variables.css file
with a valid design.
Design Considerations
In the words of Jurassic Park’s Dr. Ian Malcolm, “Your scientists were so preoccupied with whether they could, they didn't stop to think if they should.” And now that you can modify JupyterLab’s theme to your heart’s content, here is some design advice to help keep you from accidentally creating a theme that visually destroys your workspace like a rampaging tyrannosaurus rex.
JupyterLab design system
When making a theme, it’s likely you’ll want to change things that already exist in JupyterLab. Much of the UI relies
on relevant CSS variables with naming conventions (--jp-ui-font-color3 or --jp-elevation-z0) to help you find
what you need. Think of the system like this:--jp-region-contenttype-unit1
- The
--jpprefix is a constant. - The middle holds various details like what type of UI element it is for, if it is standard (no tag) or if it has a specific use.
-
regionis for variables that are only be used in a certain area of the UI . - The content type is something like
fontorborder. It describes the variable based on its use. - The
unitis the smallest unit of the variable like a color, shadow, or spacing. It is labeled by a number when there is more than one of that unit;0s are almost never used, and1s are some of the most frequently used. - Whenever a variable name does not have one of these sections, that means it doesn’t have specific rules about its use in that area.
Common labels you might want to know:
-
layoutis used for large areas of the interface, especially backgrounds. -
inverseindicates the opposite color scale of the rest of the UI. For example in light mode, inverse0and1are dark instead of light. -
elevationandzare for shadows. While these might not be the main things you want to change, their unfamiliar names might make them harder to find. -
fontis for variables tied to text. These have forms for color, size, and spacing of text.
There are also variables specific to different types of text and display modes, so you could have a theme that looks like the standard light theme until you enter Presentation mode.
Color
Less is more. Choosing a color palette of three or fewer hues can be easier to manage and make the whole interface more cohesive since those colors will likely be repeated across the UI. Try it out; it might be surprising how just changing a few color variables can create a very different JupyterLab.
A color's value—or how light or dark it is—also determines contrast. Contrast is key to legibility and creating an experience that includes low-vision users. WCAG color contrast guidelines apply to text and graphic interactive elements. There are many tools available, including downloadable contrast checkers and web app versions.
Text
JupyterLab is full of text, so this can be a place for major changes with very little code. You can easily change font,
color, spacing, and size. It's a good idea not have text below 10pt in size, or smaller than the default
--jp-ui-font-size0
(and it's an accessibility recommendation).
Icons
JupyterLab's icons live in the packages directory and are part of or based on Material Icons. If you want to change or add icons and keep them matching, finding one from this system will fit best. The Material Design system also points out some of their icon design principles which are good to follow if you need to make custom icons that match with the rest. Use SVGs, not PNGs, and remember to give it a tooltip. Most of all, make sure to give it an ARIA label (like this recommendation).
Modifying the Theme Variables
After each modification the watch process will build the extension for you. No need to stop and restart JupyterLab server; simply refresh the page.
Now we are going to modify some values in the file variables.css in our
project. This file controls many of the colors of JupyterLab, and is a nice place
to start to change the overall color scheme before doing more detailed
customisation.
We'll try to update the current theme from orange and blue to more blue-ish tones,
which tend to remind us of the holiday
season. Afterward, in the diff, see how we changed some of the colors:
diff --git a/style/variables.css b/style/variables.css
index f8c738f..9f39f14 100644
--- a/style/variables.css
+++ b/style/variables.css
@@ -87,9 +87,9 @@ all of MD as it is not optimized for dense, information rich UIs.
    */

   --jp-border-width: 1px;
-  --jp-border-color0: var(--md-grey-400);
-  --jp-border-color1: var(--md-grey-400);
-  --jp-border-color2: var(--md-grey-300);
+  --jp-border-color0: #168EA8;
+  --jp-border-color1: #168EA8;
+  --jp-border-color2: #93D3E1;
   --jp-border-color3: var(--md-grey-200);
   --jp-border-radius: 2px;

@@ -118,10 +118,10 @@ all of MD as it is not optimized for dense, information rich UIs.
We'd like the "running notebook" dot in the filesystem browser to be a snowman instead of a blue dot. Using the browser inspector, we can look at the CSS doing this and override it in my theme:
@@ -368,0 +369,26 @@
+
+.jp-DirListing-item.jp-mod-running .jp-DirListing-itemIcon:before {
+    content: '\2603'; /* snowman */
+    font-size: 10px;
+    position: absolute;
+    left: -8px;
+}
We can also add backgrounds to many of the panels. By adding a file snowflakepatterns.svg to our style directory,
we can now refer to it from our file and add the following CSS to include snowflakes in the background of
our directory listing.
/* DirListing */

body[data-jp-theme-name="JupyterLab Winter"] .jp-DirListing-content {
  background-image: url('./snowflakepattern.svg');
 }
Awesome!
Here is the final result, jupyterLab-theme-winter theme provided by Quansight. Feel free to modify it, and please suggest some themes you might like and share in the comments. For example we'd love to see a "summer 2020 theme" for our Southern Hemisphere friends. We will dive into how to distribute your themes and make them high-quality in a later blog post.
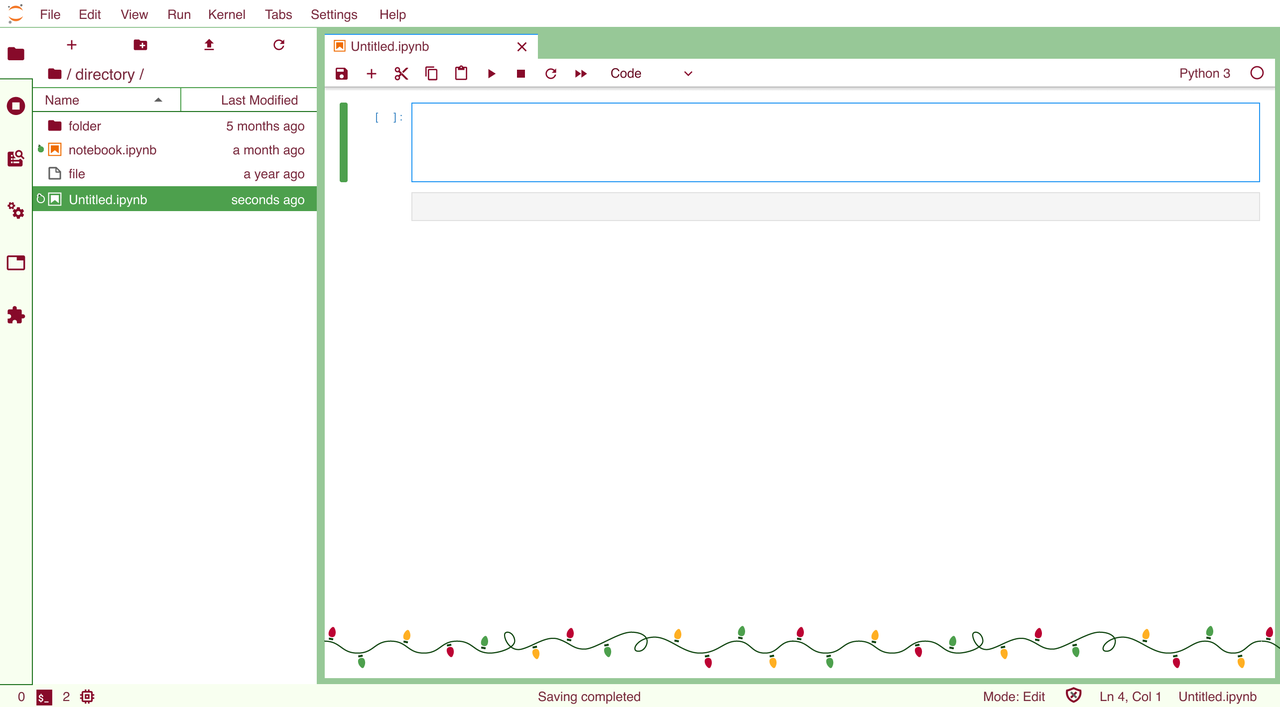
And as a bonus, a Christmas theme with more green-ish color and some lights shining at the bottom of your notebooks!
This is part of a series of Jupyter tutorials. Find more tutorials here.
Comments